This guide is for the China HPC resources (超算云平台) purchased by the group, available to all lab members. It covers everything from initial setup to job submission — please go through it before running your first calculation.
Two independent clusters
We have access to two clusters: Inner Mongolia Region 2 (内蒙二区) and Tianjin Region 1 (天津一区). Their file systems are completely independent — software compiled on one will not be available on the other. Always confirm the target cluster before submitting jobs.
System Overview & Login
The HPC portal is accessible via a web browser for job submission, file management, and key generation.
- Portal URL: http://hpc3.chinahpc.com:1016/login
- Authentication: Use your registered username and password
- Upon successful login, the system redirects to the cluster console dashboard
Language
The platform currently provides a Chinese-only interface. We have tested that Microsoft Edge’s built-in translation gives fully seamless access to all functionality — no language barrier in practice.
Login Node Rules
Login nodes are shared resources for all users. Please follow these rules strictly:
- Login nodes may only be used for editing and compilation — do NOT run computational jobs on them. The administrator will kill any processes found running on login nodes.
- When compiling software, limit to 2 concurrent compile processes or fewer.
Available Clusters & Hardware
Inner Mongolia Region 2 (内蒙二区)
CPU Partitions
| Partition | CPU Model | Cores/Node | Frequency | Memory |
|---|---|---|---|---|
p1 | Intel Xeon Gold 6138 | 40 | 2.0–3.7 GHz | 192 GB |
p1shr | Intel Xeon Gold 6138 | 40 | 2.0–3.7 GHz | 192 GB |
9242 | Intel Xeon Platinum 9242 | 96 | 2.3–3.8 GHz | 384 GB |
48cp1 | Intel Xeon Platinum 8163 | 48 | 2.5–3.1 GHz | 192 GB |
48cp2 | Intel Xeon Platinum 8255C | 48 | 2.5–3.9 GHz | 192 GB |
48cp3 | Intel Xeon Platinum 8168 | 48 | 2.7–3.7 GHz | 192 GB |
fat | Intel Xeon Platinum 8168 | 48 | 2.7–3.7 GHz | 1.5 TB |
fat2 | Intel Xeon Platinum 8168 | 48 | 2.7–3.7 GHz | 768 GB |
GPU Partitions
| Partition | CPU Model | GPU Model | Cores/Node | Frequency | Memory |
|---|---|---|---|---|---|
v100 | AMD EPYC 7443P 24-Core | Tesla V100 16GB SXM2 ×8 | 24 | 2.85–4.04 GHz | 256 GB |
v100g32 | Intel Xeon Gold 6146 | Tesla V100 32GB SXM2 ×8 | 24 | 3.2–4.2 GHz | 256 GB |
v100g32fat | Intel Xeon Gold 6146 | Tesla V100 32GB SXM2 ×8 | 24 | 3.2–4.2 GHz | 768 GB |
Tianjin Region 1 (天津一区)
CPU Partitions
| Partition | CPU Model | Cores/Node | Frequency | Memory |
|---|---|---|---|---|
p1 | Intel Xeon Platinum 8168 | 48 | 2.7–3.7 GHz | 384 GB |
p1shr | Intel Xeon Platinum 8168 | 48 | 2.7–3.7 GHz | 384 GB |
fat | Intel Xeon Platinum 8168 | 48 | 2.7–3.7 GHz | 768 GB |
Storage & File System
To ensure optimal I/O performance and avoid bottlenecking the shared file system, please strictly adhere to these directory usage rules:
| Directory | Path | Capacity | Performance | Purpose |
|---|---|---|---|---|
| Personal | /data/home/username/ | Large | Medium | Store compiled software (e.g., MACE/PET environments, VASP pseudopotentials), static scripts, and personal data backups |
| Work | /ssd/work/username/ | Small | Very High | All active jobs MUST be executed here (especially I/O-intensive VASP relaxations or MD trajectories). Once calculations are complete, migrate results off the cluster to free up quota |
| Group/Shared | /data/group_home/username/ | — | — | Share collaborative project files, common datasets, and public models with other lab members |
Tip
Within the same cluster, files can be freely migrated or copied between the Personal and Work directories.
Storage Quotas
| Directory | Default Quota | Shared With |
|---|---|---|
/data/home/username/ (Personal) | 500 GB | — |
/ssd/work/username/ (Work) | 100 GB | — |
/data/group_home/username/ (Group) | Shares Personal quota | Sub-accounts |
Shared quota
Sub-accounts share the main account’s storage quota — all lab members collectively draw from the same limited pool. To avoid quota exhaustion blocking everyone’s work, please promptly migrate completed results to your local machine or another server after jobs finish.
SSH Key Generation & Local Configuration
For security, password logins via SSH are disabled; RSA key authentication is required.
Step 1: Generate and Download Your Key
- Log into the web portal at http://hpc3.chinahpc.com:1016/login
- Navigate to Personal Center → SSH Key Management
- Click Reset Key and change the validity period to 1 Year to avoid frequent expirations
- Download the key file to your local machine (recommended:
~/.ssh/directory)
Warning
Each cluster uses a different key file — make sure you download the correct one for the cluster you intend to use.
Step 2: Fix File Permissions (macOS / Linux)
Your native SSH client will reject the downloaded key for being “too open” (Permission denied - publickey). Restrict its permissions before connecting:
chmod 600 ~/.ssh/your_downloaded_key_file.txtWindows users
Simply place the key file under
C:\Users\<your_username>\.ssh\— Windows does not enforce the same strict permission checks, so this step is generally not needed.
Step 3: Configure ~/.ssh/config
Edit your local SSH config file (~/.ssh/config) and add the following entries. Update User and IdentityFile with your platform username and the path to your downloaded key.
Inner Mongolia Region 2:
Host HPC-InnerMongolia
    HostName hpc3.chinahpc.com
    Port 1014
    User <your_username>
    IdentityFile ~/.ssh/<your_downloaded_key_file.txt>
If the default hostname is unreachable, add these fallback entries:
# China Telecom fallback
Host HPC-InnerMongolia-CT
    HostName 222.74.8.218
    Port 1014
    User <your_username>
    IdentityFile ~/.ssh/<your_downloaded_key_file.txt>

# China Unicom fallback
Host HPC-InnerMongolia-CU
    HostName 60.31.21.42
    Port 1014
    User <your_username>
    IdentityFile ~/.ssh/<your_downloaded_key_file.txt>
Tianjin Region 1:
Host HPC-Tianjin
    HostName tj1.chinahpc.com
    Port 1014
    User <your_username>
    IdentityFile ~/.ssh/<your_downloaded_key_file.txt>
If the default hostname is unreachable:
Host HPC-Tianjin-CT
    HostName 118.186.2.138
    Port 1014
    User <your_username>
    IdentityFile ~/.ssh/<your_downloaded_key_file.txt>
Step 4: Connect
Once the config file is in place, connect from any terminal with a single command:
ssh HPC-InnerMongoliaOr for Tianjin:
ssh HPC-TianjinThis also works directly in VS Code — open the command palette (Cmd+Shift+P), select Remote-SSH: Connect to Host…, and choose HPC-InnerMongolia or HPC-Tianjin from the list.
Connection issues
If the connection times out or the network is unstable, try the fallback hosts (
HPC-InnerMongolia-CT,HPC-InnerMongolia-CU, orHPC-Tianjin-CT). Also verify your key file matches the target cluster — different clusters use different keys.
GUI Job Submission (Recommended)
The cluster provides a graphical web interface with many common computational software packages pre-installed. This is the recommended way to submit jobs — the GUI automatically generates properly configured submission scripts, eliminating manual scripting errors.
Quick Walkthrough (VASP Example)
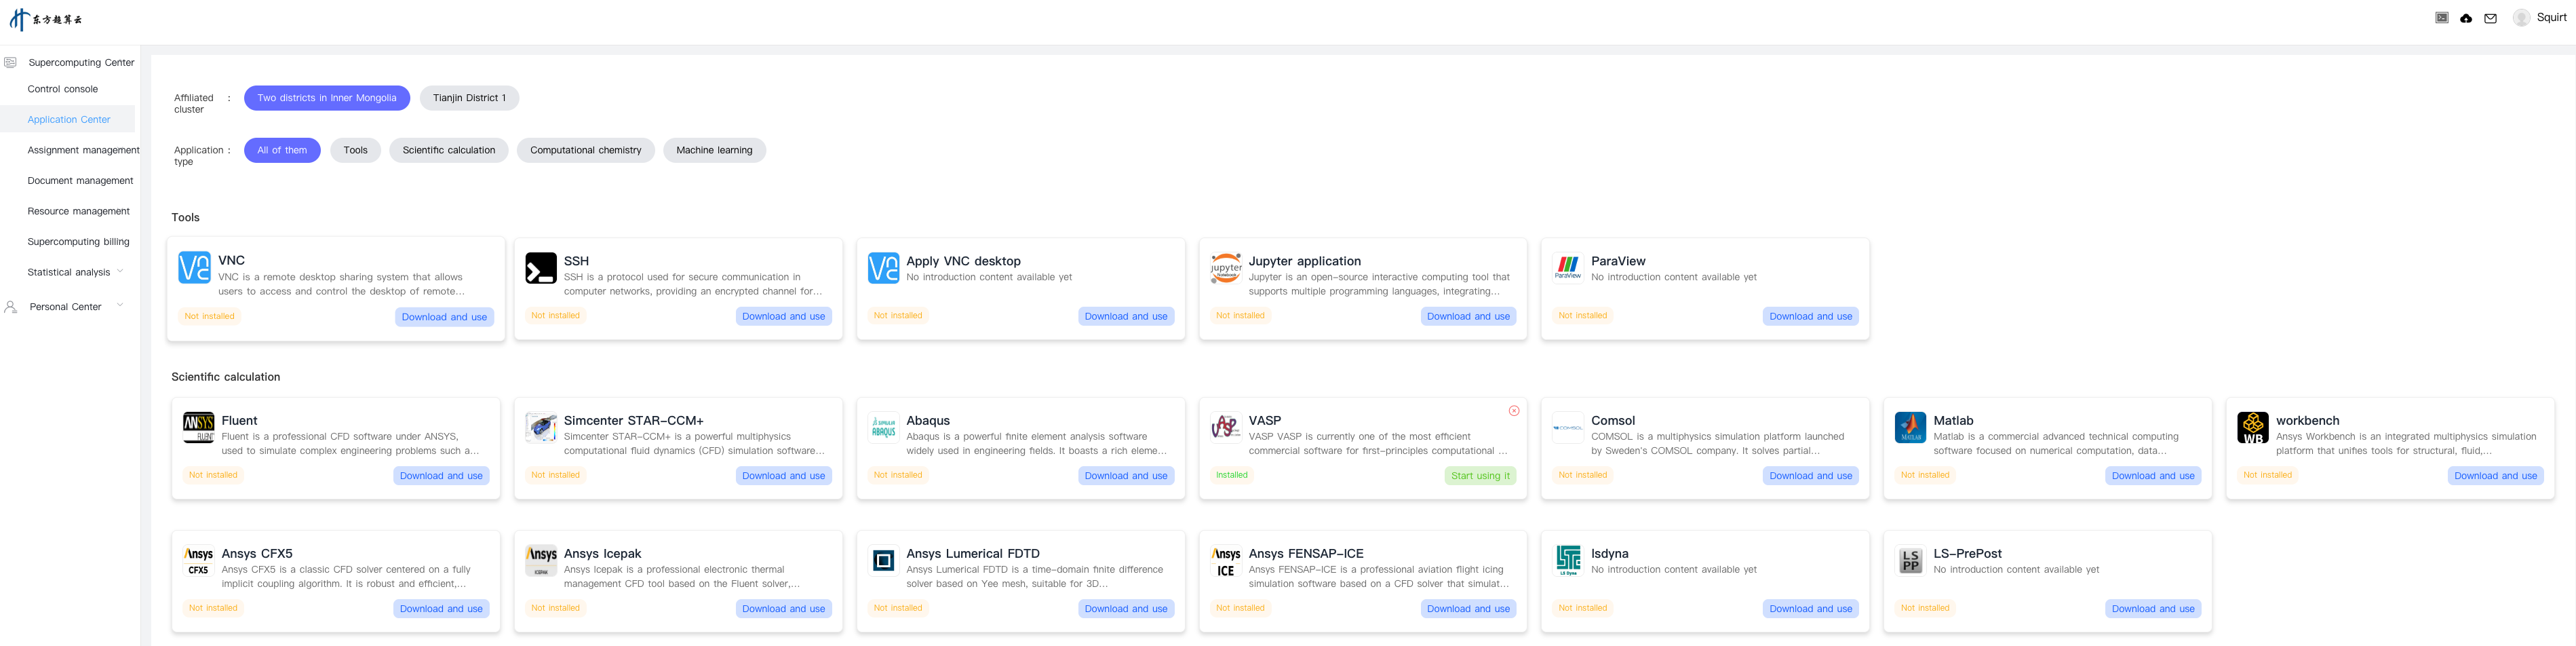
Step 1 — Install the application: Navigate to “App Center” (应用中心), find VASP, and click the “Download & Use” (下载使用) button. Once installed, VASP will appear in the “Quick Launch” (快速启动) section of the console dashboard.
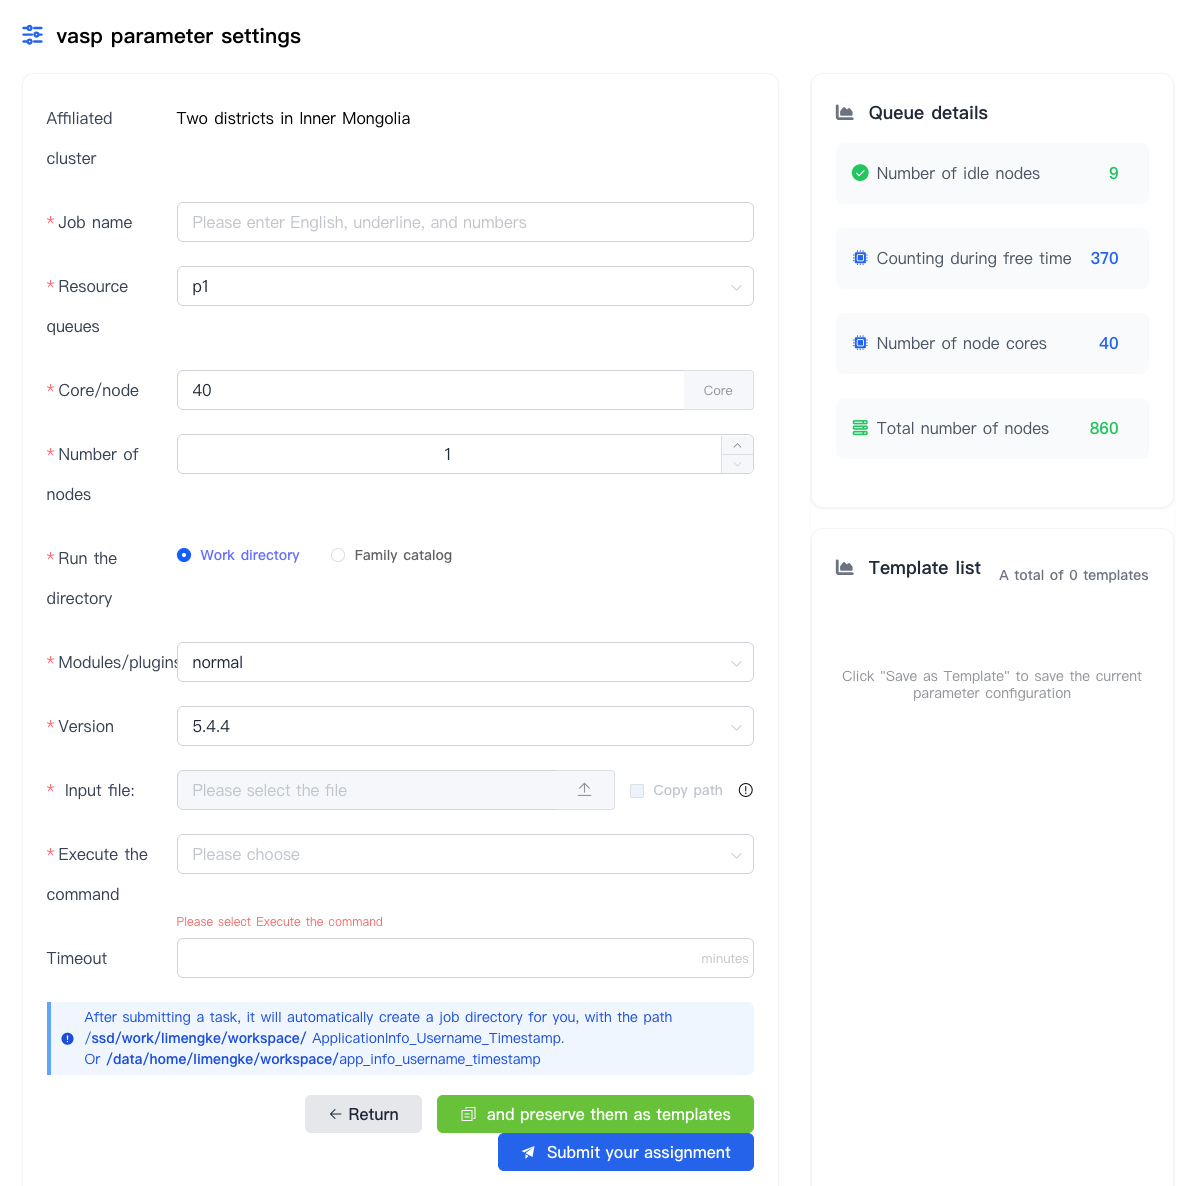
Step 2 — Select input files and submit: Click “Start Using” (开始使用) on the VASP card. The submission form lets you:
- Select your input files (INCAR, POSCAR, POTCAR, KPOINTS)
- Choose the target partition (queue)
- Set the number of CPU cores and nodes
- Pick the software version
Click Submit and the job is sent to the queue immediately — no manual script writing required.
Step 3 — Monitor and retrieve results:
- View real-time job status in the “Job List” (作业列表), including run time, output logs, and queue position
- When the job completes, results are written to the output directory displayed on the submission form (typically under your work directory)
- Once you’ve confirmed the results, migrate them to your local machine or another server to free up shared storage quota
Tip
For optimal I/O performance, always set your job’s working directory to the high-performance SSD path
/ssd/work/username/. After the calculation completes, migrate the results to your local machine to free up quota.
Pre-Installed Software
The App Center includes commonly used software such as VASP, COMSOL, MATLAB, and more. Browse the full catalog from the App Center panel. For applications not yet installed, clicking “Download & Use” handles the one-click setup.
Large File Transfers (SFTP)
Warning
Do not drag and drop files larger than a few hundred megabytes directly through VS Code.
For transferring large datasets or trajectory files, use an SFTP client such as WinSCP, FileZilla, or Xftp.
| Cluster | China Telecom SFTP | China Unicom SFTP |
|---|---|---|
| Inner Mongolia Region 2 | 222.74.8.218:1018 | 60.31.21.42:1018 |
| Tianjin Region 1 | 118.186.2.138:1018 | — |
Warning
The port for SFTP data transfer is 1018. Do not use the standard SSH port (1014) for SFTP transfers.
FileZilla Quick Setup
- Create a new site, choose protocol
SFTP - Host: enter the corresponding cluster’s SFTP address
- Port:
1018 - User: your username
- Logon Type: select “Key file”, browse and select your downloaded key file
Tip
If file transfers fail, double-check you are using SFTP port 1018 (not the SSH port 1014). For large files, always use a dedicated SFTP client — do not attempt transfers through VS Code.
WinSCP Setup (Windows)
WinSCP is the recommended SFTP client for Windows users.
- Download: https://winscp.net/eng/download.php
Usage Instructions
- Launch WinSCP and create a new site
- Enter the SFTP IP address and port 1018
- Enter your username
- Configure the key file:
- Click Advanced → SSH → Authentication
- Under “Private key file”, select your downloaded key file
- Convert the key file to
.ppkformat when prompted
- Click Login to establish the connection
Web SSH (Browser-Based)
The platform provides an in-browser Web SSH feature, allowing you to use cluster resources without a local SSH client.
How to Access
- Quick Entry: Click the “Quick WEBSSH” button at the top-right of the console
- Quick Launch: Use the SSH option in the “Quick Launch” section of the console
Features
- Terminal window settings and shortcut key configuration
- In-browser file management
- Multi-pane SSH (split-screen)
- Cluster switching via the top-right cluster selector
VNC Visualization
The platform supports VNC remote desktop connections for GUI-based applications.
How to Access
- Console “Quick Launch” → VNC Visualization
- “App Center” → VNC Template
Parameter Configuration
- Target Cluster: Use the “Cluster Selection” module in the console or the “Belonging Cluster” selector in App Center
- Validity Duration: Set the VNC session lifetime
- Resolution: Configure the desktop resolution
- Click “Submit Job” when ready
Monitoring
Navigate to the “Visual Connections” panel in the console to monitor VNC job details (latest start time, scheduled shutdown time, etc.).
Warning
VNC jobs have an expiration time. If you need to continue beyond the expiration, promptly request an extension during the session.
XSHELL Connection (Alternative)
XSHELL is a popular terminal emulator for Windows users who prefer a native SSH client over the browser-based Web SSH.
Connection Steps
-
Launch XSHELL and open the command input area
-
Enter the SSH connection command using the cluster’s hostname and port:
ssh -p 1014 username@hpc3.chinahpc.com -
When prompted for authentication, select the downloaded key file as your identity credential
-
Upon successful connection, you can use cluster resources as you would in any local terminal
Contact & Support
If you encounter any issues while using the cluster, please reach out promptly:
| Name | |
|---|---|
| Prof. Zeyu Deng (PI) | msedz@nus.edu.sg |
| Li Mengke | limengke@nus.edu.sg |
This document is for internal use by members of the Deng Group. Please do not distribute outside the group. Source: deng-group/China_hpc_guide (last updated 2026-06-22).